Elasticsearch is a free, open search analytics engine for all types of data. Elasticsearch is the most popular search engine out there. It can be used to quickly index, retrieve and search among the entries. For example, GitHub uses Elasticsearch for user searches in the repository, users, and other documents and entries. Also, when you search for an item on an e-commerce website, you are probably performing a search query inside an elastic search instance. Besides these user-facing applications, many organizations use Elasticsearch for their internal analytics and monitoring jobs. Elasticsearch is distributed. It means that multiple instances of Elasticsearch on multiple servers act as one big index that can be scaled to hundreds of servers. In this document, we will talk about how to deploy a single instance of Elasticsearch on the Doprax cloud platform.
Add Elasticseaarch
To use Elasticsearch in your project, you have to add it as a service. Go to your services tab and click add ‘service’. On the next page, chose ‘Elasticsearch’ and click on the ‘add’ button. It will ask for a mandatory discovery_type environment variable. For a single node installation (which is our case), leave it blank.
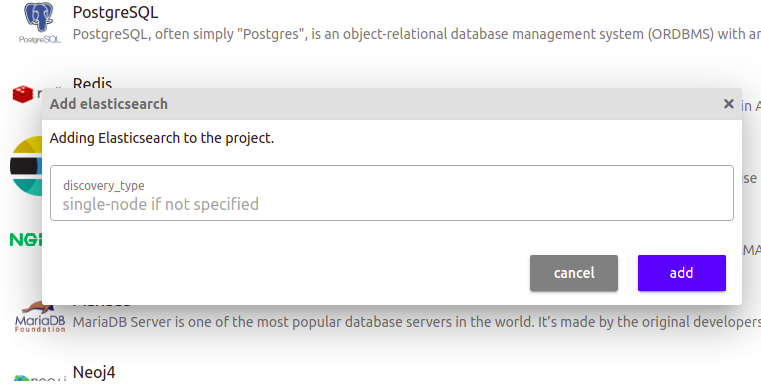
Then, if you come back to your services tab, you can see the Elasticsearch listed under added services.
Environment variables
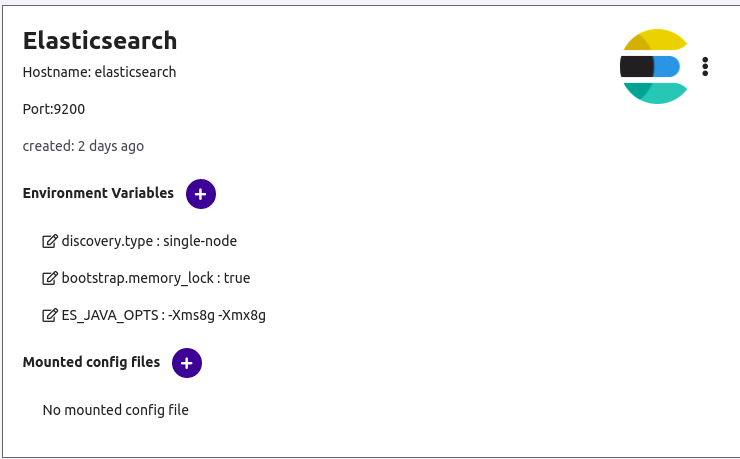
For the maximum performance of your Elasticsearch instance, you need to also set two other environment variables.
bootstrap.memory_lock: This environment variable controls memory allocation and prevents Elasticsearch from using SWAP memory. It gives the Elasticsearch instance maximum performance. Set this environment variable to true.
ES_JAVA_OPTS: This option controls the size of the JVM heap. In this example, it has been set to 8GB by setting this environment variable to -Xms8g -Xmx8g. It sets the maximum and minimum heap sizes.
For more information about all the options, you can visit the https://www.elastic.co/guide/en/elasticsearch/reference/current/docker.html. At the end, the service should look like the below image in ‘service’ tab.
Add volume
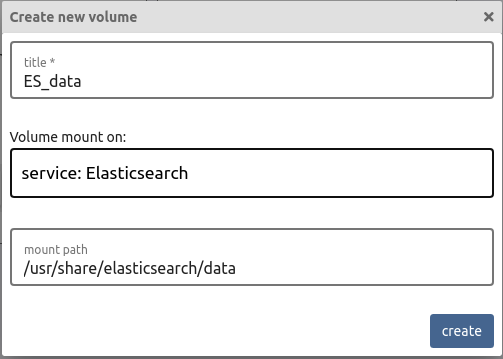
By default, Elasticsearch uses the writable layer of the container to save its indexes. But just like every other container, all data will be erased when the container is stopped or restarted. Even if you don’t need to save data, using this writable layer reduces the performance. To solve this, we need to create a volume and mount it on the Elasticsearch container. Go to the ‘volumes’ tab and click on create a volume button. Give the volume a name and for the ‘mount on’ option, choose Elasticsearch. The mount path for Elasticsearch should be /usr/share/elasticsearch/data.
Run Elasticsearch
To run your newly added Elasticsearch service, you need to go to the ‘deploy’ tab in your project. Then click the ‘run’ button on the Elasticsearch service and everything will be built and run in a couple of minutes.
Before running the Elasticsearch instance, we should probably increase the resource size (RAM and CPU cores). Since I am going to have a big index size and I have already had a JVM heap size set to 8GB, I need to give Elasticsearch at least 8GB of RAM and I will choose 2 vCPU cores. Click on the cog icon to change the resource size:
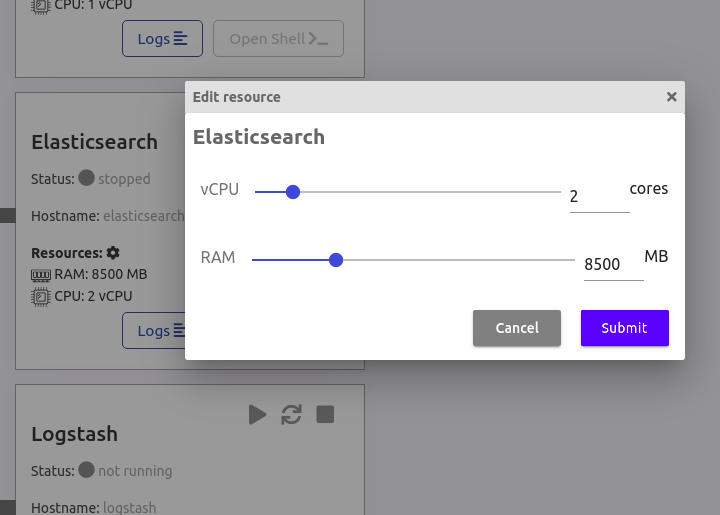
After that, you can run the Elasticsearch container. Check out the logs to see if there are any problems and issues there.
Permission problem
One issue that might arise when using a volume for Elasticsearch is the writing permission and ownership of the volume. If the Elasticsearch does not have the permission to write on the volume path (/usr/share/elasticsearch/data), it will fail to start. You can easily change the permission of the folder by opening a shell. The real problem is here; If the Elasticsearch does not have permission to write to the volume, it will fail to start. Shell is only possible for the containers that are at the running stage.
Then how exactly should we open a shell into that?!
One possible solution is to temporarily mount the Elasticsearch volume to another container (for example main) and use the shell of the main to change the permissions of the volume path. We will then mount it back to the Elasticsearch container. Let’s do this.
Go to the volumes tab and find ES_data volume. Click on the three dots (ellipses) and click ‘settings’. Then choose another container to mount to. I am going to choose the main container. It should look like this:
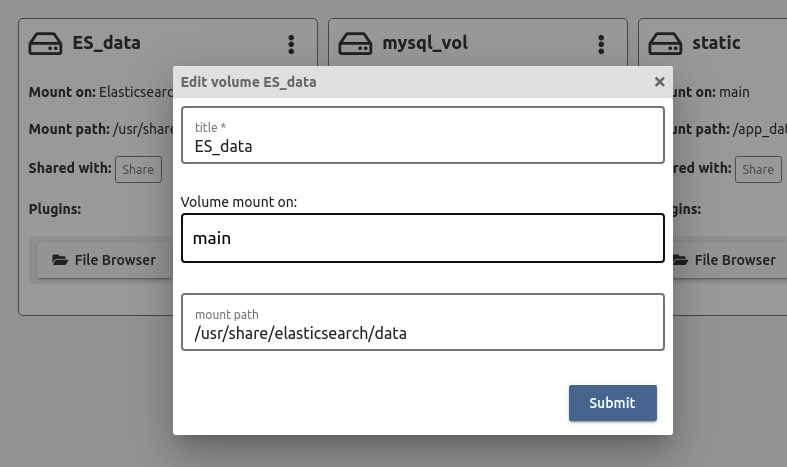
Then go back to the deploy tab and restart the main changes so that it will take effect and the volume could be mounted to main. When the main container goes into the running mode, it is time to open a shell and change the permission of this folder. By default, the Elasticsearch container uses a user named ‘elasticsearch’ and has the code of 1000. Open the shell on ES_data and enter the following commands to change the ownership to the user with code of 1000 and group of 1000 and then give it the writing permission
chown 1000:1000 /usr/share/elasticsearch/data -R
chmod +w /usr/share/elasticsearch/data
Now that the volume path has appropriate permissions, it is time to mount it back to the Elasticsearch container. Go to the ‘volumes’ tab and click on the three-dot (ellipses) of the ES_data volume and select Elasticsearch for mount on. Now go to the deploy tab and restart the Elasticsearch container. This time there should be no problems. Check out the logs to see if there are any issues.
Check the health of Elasticsearch
To make sure that the Elasticsearch is healthy and without any problems, you should open a terminal on the Elasticsearch containers (in deploy tab) and enter the following command
curl -X GET "localhost:9200/_cluster/health?timeout=50s&pretty"
The result should be something like this:
Notice the green status.
{
  "cluster_name" : "docker-cluster",
  "status" : "green",
  "timed_out" : false,
  "number_of_nodes" : 1,
  "number_of_data_nodes" : 1,
  "active_primary_shards" : 0,
  "active_shards" : 0,
  "relocating_shards" : 0,
  "initializing_shards" : 0,
  "unassigned_shards" : 0,
  "delayed_unassigned_shards" : 0,
  "number_of_pending_tasks" : 0,
  "number_of_in_flight_fetch" : 0,
  "task_max_waiting_in_queue_millis" : 0,
  "active_shards_percent_as_number" : 100.0
}
Now you can access the elasticsearch from the main and other containers on the Elasticsearch host (with the hostname of elasticsearch) and on the port of 9200. For example from the main container, you can run the previous command like this:
curl -X GET "elasticsearch:9200/_cluster/health?timeout=50s&pretty"
Notice that we have changed the localhost to elasticsearch since we are connecting to the elasticsearch from outside the elasticsearch container. That is possible because containers of the project are connected to the same private network. You can also use the assigned private IP of each container for communications. But every time a new service is started and stopped it may receive another IP. Because of this, it is much easier to use hostnames for communications. The hostname of each service by default is the name of the service (here it is elasticsearch).