Why do we need volumes?
The default filesystem for applications and services running on Doprax is ephemeral, meaning that the data written in them will be lost when the application or service is stopped or restarted. If you have a stateless application, it is no problem for you but in most cases, the application needs to write some persistent data to disk.
File uploads in applications:
- Databases like Redis, MySQL, and MongoDB.
- Blogging CMSs like WordPress, Drupal.
- Infrastructure services like Elasticsearch, Kafka, and RabbitMQ.
- Collaboration apps like Mattermost, GitLab.
These are some of the use cases for volumes. In Doprax, volumes are used to store data.
Create volumes
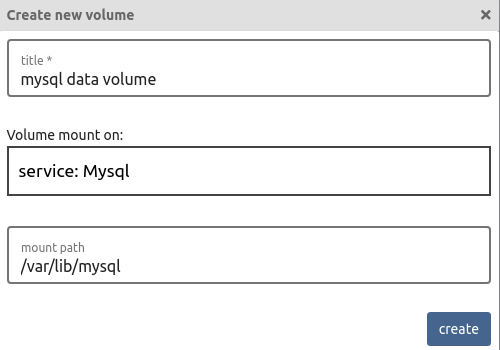
To create a volume, you need to go to the ‘volumes’ sub-section and click on create volume button. A dialog will be open and it will ask you to provide a title, mount on (the main or a service), and also the mount path. The ‘title’ is a human-readable title. The ‘mount on’ is the container that you want to mount a volume to. For example, in the image below, it can be seen that the main has been selected so the volume will be mounted on the main container. The mount path, is the path inside the container that you want to mount the volume. In the example below, we will mount the volume on /app_data/static/ path inside the main container.
Click ‘create’ and a new volume will be created. It will look like this:

Sharing volume with other containers
A volume can be mounted on multiple containers at the same time. This is a very important feature of volumes in Doprax.
In the above example, in order to enable Nginx to serve static files, we need to share the static volume (that is directly mounted on the main) with the Nginx container. To do that, click on the share button. Next time you restart the Nginx container, the static volume will also be mounted on it.
Another option that is important in sharing the volumes is the mount mode, which can be ‘read-only’ and ‘read and write’. It is important to note that if you share a volume with ‘read and write’ mode and two containers write to the same file at the same time, it could lead to corruption of the data or overwriting of the data. So take extra caution. In this example, since Nginx does not need to write anything to the volume, we will mount it in ‘read-only’ mode.

Using File Browser
The content of each volume could be viewed using a special plugin called File Browser. By clicking on the File Browser, a link will appear near the icon. Click on it to open the login page of the file browser. The default username is admin and the default password is also admin. The URL of the login page is generated randomly and each time it is different.

The inside of the file browser looks like this:

Using file browser you can:
- View the directory structure, files, thumbnail of images.
- Quickly edit code or text files using a built-in editor.
- Create files and folders, copy them and move them around
- Upload files and folders
- Download files
- Download folders in Zip, Gzip, and other archive formats (you can backup the entire volume using this option).
For more information about file browser utility, you can visit its website https://filebrowser.org/.