In this document, we are going to learn about connecting your custom domain to your app. Doprax automatically assigns your app a free subdomain (something.dopraxapp.com). For real-world use cases, you usually want to have your custom domain name so that your users and customers can access your app easily. Connecting your domain to your app is very easy, let’s see how it works!
Doprax domain settings
To access the domain settings, from the left menu click on “Settings”. At the top of the page, there is this Domain settings section. It has been shown in the image below.

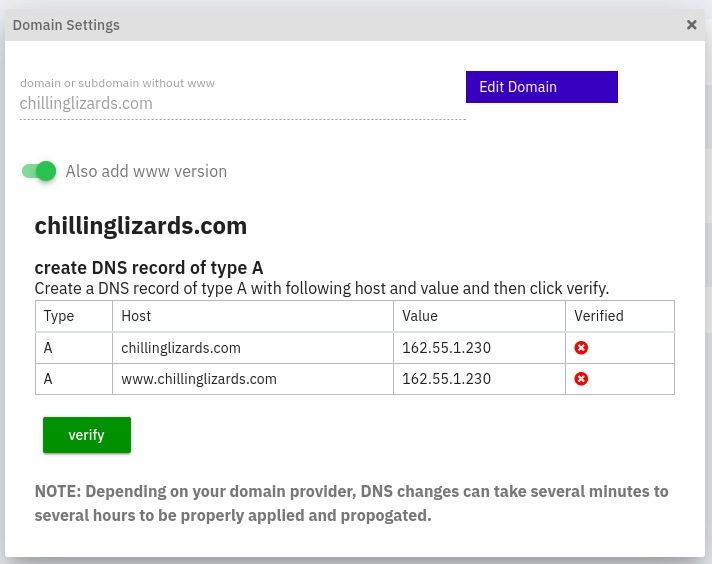
Click on the “Add domain” button. A window will appear. In this window, enter your domain name. In this example, the domain name is “chillinglizards.com”. If you want your domain name to have a www, toggle the “Also add www version” option. Then click ‘submit domain’.

When you submit the domain name, next you will see some extra information. You will be asked to enter an “A type” record to your DNS. Then by clicking on the ‘verify’ button, if everything is set up correctly, the domain name will be connected to your application.
What is DNS?
The Domain Name System (DNS) is like the phonebook for the Internet. People like to access information online through domain names. For example nytimes.com or google.com. Because for humans memorizing a name is much easier than a bunch of numbers. Web browsers on the other hand use IP addresses.
An IP address is a unique identifier assigned to a device or domain that connects to the Internet. Each IP address is a series of characters, such as ‘192.168.1.1’. DNS translates domain names to IP addresses so browsers can load Internet resources.
There are different ways to manage the DNS of your domain. Here we will discuss two options, Godaddy and Cloudflare.
Using Godaddy
Godaddy is a domain registrar, so you can buy domains from them. Also, they provide DNS management for the domains that they sell. In godaddy.com, click on your ‘domain name’ and open the domain settings. On this page click on ‘DNS management’.
On the DNS management page, you can see the DNS records of your domain. If it is a fresh domain that you have bought from Godaddy, it usually has some default values. It looks something like this:

All we have to do is add one A record to our DNS records.
NB: If you have selected the WWW version, you need to add two A records.
If there are some A records already there, go ahead and delete them. Click on “Add” to add a new record. For the name of the record, you can use @ instead of the root domain name. For the value, enter the IP address that you got from the Doprax domain settings. (in this example, 162.55.1.230). For the WWW version, enter your domain name with www and enter the IP address for the value also. For the WWW version, you can also use a CNAME record type and enter www for the name and your domain without www for the value.
Now you can go back to the Doprax domain settings and click verify to finalize the connection of your domain to your application on Doprax.
Using Cloudflare
One of the best options is to use Cloudflare for DNS management. We strongly suggest that you use this service. Now we explain how to set up your Cloudflare account and use it to manage your DNS.
Change name server
In order to use Cloudflare, first we need to change the nameserver of our domain to Cloudflare. This way, we can use Cloudflare for our DNS management. Each domain has a name server. This name server is responsible for the management of all DNS records. When you buy a domain from a company, let’s say Godaddy.com, there is always an option to set the name servers of your domain.
Create an account on Cloudflare and on the top menu, click on ‘add site’. Enter your domain and click on the ‘add site’ button. On the next page, click on the free plan, and click ‘continue’. Then it will scan for your current DNS record. On the next screen, you will see the list of current DNS records. click continue and you will be directed to a page similar to the one below.

Now Cloudflare shows you the value of the nameservers.
To change the nameserver as has been suggested in the above image, you need to log in to your domain 1registrar, (like GoDaddy, NameCheap, Domain.com, Google Domains, …) and change the nameservers. In the example above the nameservers are “dell.ns.cloudflare.com” and “rick.ns.cloudflare.com”.
After you have changed the nameserver of your domain in your domain registrar administration panel, you can click on “Done, check nameservers” and you are almost ready to go. Bear in mind that changing nameservers could take a little while to take effect. From a few minutes to a few hours or even more. When the change of nameserver happens, in the dashboard of your Cloudflare account, your domain will be marked as “Active”.
Now you can go to the DNS tab from the left menu where you can add or remove DNS records. Enter your A records here. If you don’t have any other existing records, it should be something like this:

Now if you go back to Doprax domain settings and click on ‘Verify’ button, your DNS records should be verified. The domain connection is done!

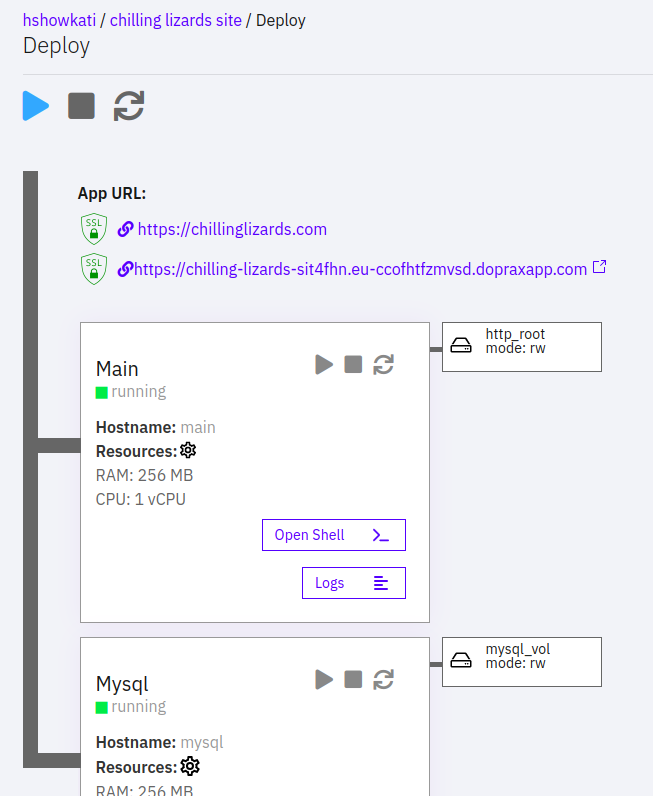
NOTE: If your app is already running while you are adding your domain to it, for changes to take effect, you need to restart your app. To do that, go to the ‘deploy’ tab of your app. There you can see your domain and also the free auto-generated subdomain. It should look like this:
NOTE: When you add your domain, it may take a few minutes for your SSL certificate for HTTPS to be generated.