
Welcome to our friendly, step-by-step guide designed specifically for beginners on how to create and deploy a Telegram bot using Doprax! If you’re new to the world of coding or have always been curious about how bots are made but didn’t know where to start, you’re in the perfect place. We assume that you have basic knowledge of Python programming or other basic programming tools like git, etc.. So we won’t be explaining python syntax or other tools in this tutorial.
Running a Telegram bot on a cloud server is a great way to ensure your bot is always available to interact with users.
This guide is tailored to help absolute beginners navigate through the exciting process of bringing a Telegram bot to life, all the way from conception to deployment on the Doprax platform. With simple instructions and easy-to-understand language, we’ll make sure you have all the tools and knowledge needed to launch your very own bot. Let’s get started.
Step 1: Create Your Telegram Bot
To create a telegram bot you need to obtain your bot’s API token.
Start a chat with BotFather: Search for @BotFather in Telegram and start a conversation. BotFather is the official Telegram bot for creating other bots.
Create a new bot: Send the /newbot command and follow the instructions. You’ll be asked to choose a name and a username for your bot. Let’s name it “pesto rico” since I love pesto and it’s delicious
Save your API token: After creating your bot, BotFather will provide you with an API token. This token is crucial as it will allow your Python script to interact with the Telegram Bot API.
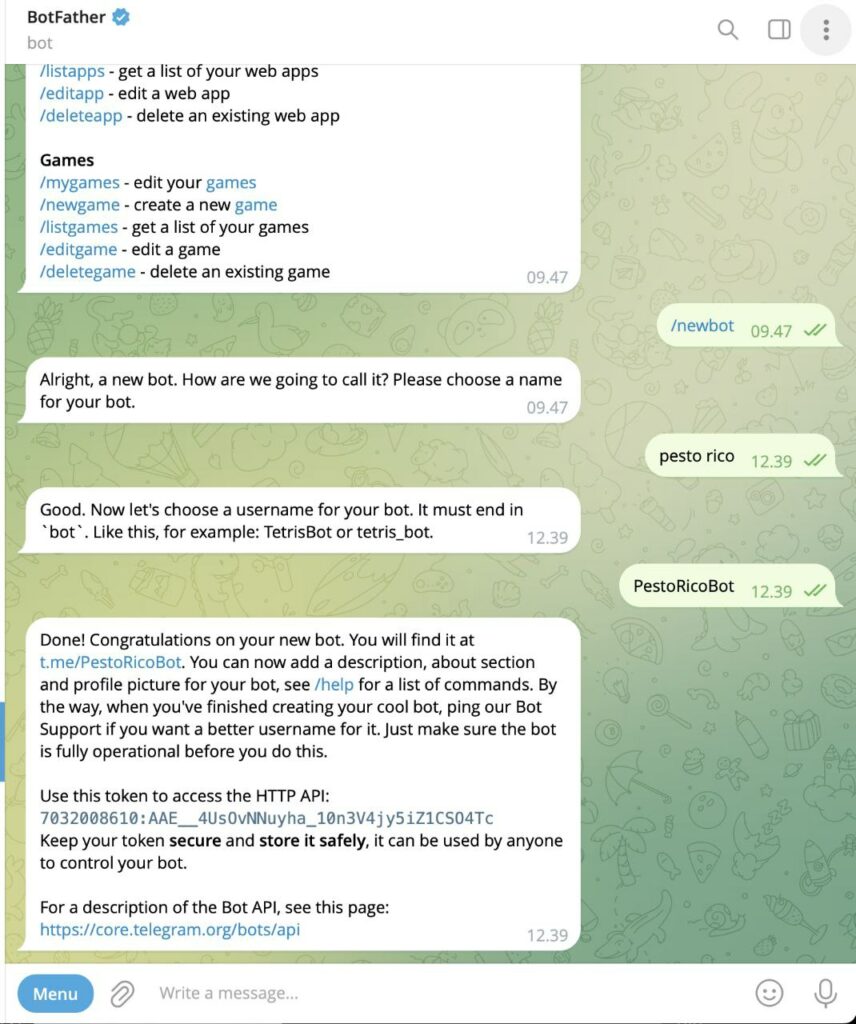
Please be sure this token is safe and secret because anybody who has access can easily manipulate your bot and probably will do so.
Step 2: Writing the Python Bot
With your API token in hand, it’s time to write the Python code for your bot. there are several Python libraries for making telegram bots, we are going to use Pytelegrambotapi.
An overview of pyTelegramBotAPI
The “pyTelegramBotAPI” package is a Python library that provides an interface to the Telegram Bot API. It allows for the creation of bots for Telegram using Python, offering a straightforward and efficient way to interact with the Telegram API. The package supports both synchronous and asynchronous programming paradigms, making it flexible for various programming needs. It’s designed to be easy to learn and use, providing a wide range of functionalities to interact with users and Telegram services. The library is regularly updated, so it’s recommended to keep it up-to-date in your projects.
Why should we use pyTelegramBotAPI?
There are several reasons why this package is a good option for making a telegram bot but I think these are the important ones:
Easy to Use: Designed with simplicity in mind, pyTelegramBotAPI enables rapid bot development and prototyping, making it accessible for beginners while still powerful enough for advanced users.
Synchronous and Asynchronous Support: It offers both synchronous and asynchronous programming paradigms, allowing developers to choose the one that best fits their application’s needs.
Comprehensive API Coverage: The library covers the full Telegram Bot API, meaning you can perform any action that the official API supports, from sending messages and photos to handling inline queries and custom keyboards.
Webhook and Polling: pyTelegramBotAPI supports both webhook and polling methods for receiving updates from Telegram. This flexibility allows developers to choose the best way to handle incoming messages based on their server’s capabilities and requirements.
Core Concepts of pyTelegramBotAPI
Bot Token: To use pyTelegramBotAPI, you need a bot token obtained from Telegram’s BotFather. This token is a unique identifier for your bot and is used to authenticate your requests to the Telegram API.
Handlers and Decorators: The library uses handlers and decorators to manage bot commands and messages. You define functions to handle specific types of events (e.g., commands, text messages) and annotate these functions with decorators provided by pyTelegramBotAPI.
Messages and Types: pyTelegramBotAPI encapsulates Telegram’s various message types, such as text, audio, video, and more. Each type has associated methods for easy handling and response.
Custom Keyboards and Inline Keyboards: The library supports creating custom keyboards and inline keyboards, allowing for interactive bots that can offer users a richer interface directly within the chat.
When it comes to Telegram bots, there are two main types:
1)Informational
2)Utility bots.
Informational bots: These are like instant librarians, giving users news, weather updates, or financial data right in their chat. They save you time by providing quick access to information without needing to search through websites or apps.
Utility bots: These are like multitaskers in Telegram. They offer various services such as setting reminders or translating languages. Utility bots make life simpler by bringing different functionalities together in one easy-to-use platform.
We want to make a Telegram bot that mixes both kinds we talked about. This bot will let you type in the name of a cryptocurrency, and it will tell you how much it’s worth in US dollars. This project shows how useful bots are for getting real-time money info, and it’s a simple guide for making your own interactive tool in Telegram. It’s a good example of how bots make it easy to get tricky data, so it’s perfect for our tutorial on making your own Telegram bot. There are some open APIs to fetch the cryptocurrency prices in USD, we are going to use Coingecko API which is simple and easy.
Creating a simple Telegram bot that fetches cryptocurrency prices from the CoinGecko API involves a few straightforward steps. Below is a basic example of how to implement such a bot using the pyTelegramBotAPI library in Python. This tutorial assumes you have a basic understanding of Python and have both pyTelegramBotAPI and requests libraries installed. if not let’s install both libraries.
Open vs code, let’s create a Python file and name it telegram_bot.py. Since we gonna be installing some packages we need to create Python virtual environment.
Python virtual environments are essential tools for managing dependencies and isolating project environments. They allow you to work on different projects with different sets of dependencies without worrying about conflicts.
Install virtualenv (if not already installed)
Before creating virtual environments, ensure you have virtualenv installed. You can install it via pip, the Python package manager, with the following command:
pip install virtualenv
Here, venv is the name of the directory where the virtual environment will be created. You can replace venv with any name you prefer.
Activate the Virtual Environment
After creating the virtual environment, you need to activate it. The activation process varies depending on your operating system, we’re using Mac which is the same with Linux:
source venv/bin/activate
Once activated, you’ll notice that the command prompt changes to indicate that you’re now working within the virtual environment.
Install both libraries
pip install pyTelegramBotAPI requests
Both packages installed successfully, let’s start writing the Python script. We will be explaining line by line of the script.
import telebot
import requests

BOT_TOKEN = "7032008610:AAE__4UsOvNNuyha_10n3V4jy5iZ1CSO4Tc"
bot = telebot.TeleBot(BOT_TOKEN)

def get_crypto_price(crypto):
    url = f'https://api.coingecko.com/api/v3/simple/price?ids={crypto}&vs_currencies=usd'
    response = requests.get(url)
    data = response.json()
    price = data.get(crypto, {}).get('usd', 'Unavailable')
    print(price,100*"-")
    return price

@bot.message_handler(commands=['start', 'help'])
def send_welcome(message):
    bot.reply_to(message, "Hey I'm pesto rico bot i tell you about the latest cryptocurrency prcices in USD! for example type: /price bitcoin")

@bot.message_handler(commands=['price'])
def price(message):
    try:
        crypto = message.text.split()[1]  # Extract the cryptocurrency ID from the message
        price = get_crypto_price(crypto)
        bot.reply_to(message, f"The current price of {crypto} is: ${price} USD")
    except IndexError:
        bot.reply_to(message, "Please specify a cryptocurrency ID. For example, /price bitcoin")
    except Exception as e:
        bot.reply_to(message, f"Error: {str(e)}")

bot.polling()
So let’s explain the script line by line:
Import telebot: TeleBot is a synchronous and asynchronous implementation of Telegram Bot API which provides a way to interact with Telegram
Import requests: Imports the Requests library, as you know this is a popular Python library used for making HTTP requests to web servers.
BOT_TOKEN = “70320…CSO4Tc”: This line sets the BOT_TOKEN variable to a specific string value, which is the token provided by BotFather for your bot. This token is used for authentication with the Telegram API.
bot = telebot.TeleBot(BOT_TOKEN): This line creates a new instance of TeleBot, passing the bot token as an argument. This instance will be used to interact with the Telegram API.
get_crypto_price Function: This is a python function that takes a cryptocurrency ID as input and fetches its current price in USD.
url = f’https://api.coingecko.com/api/v3/simple/price?ids={crypto}&vs_currencies=usd’: Constructs the URL for the CoinGecko API request to get the price of the specified cryptocurrency in USD.
data = response.json(): Parses the JSON response body into a Python dictionary.
price = data.get(crypto, {}).get(‘usd’, ‘Unavailable’): Extracts the price of the cryptocurrency in USD from the response data. If the price is not available, it defaults to ‘Unavailable’.
print(price,100*-“): Prints the price followed by a long line of dashes (for clarity or debugging purposes, it’s not best practice but it’s easy for the beginning 🙂 ).
return price: Returns the fetched price.
price Function:
Decorated with @bot.message_handler(commands=[‘price’]), this function handles the ‘/price’ command.
Tries to extract the cryptocurrency ID from the message text. If successful, it fetches the cryptocurrency price and replies to the user with the current price. If the cryptocurrency ID is not specified or another error occurs, it catches the exception and replies with an appropriate error message.
Bot Polling:
bot.polling(): Starts polling the Telegram API for new messages. This is a blocking call that continuously checks for new messages and dispatches them to the registered handlers.
So I hope everything is clear so far let’s go for testing!
Testing the bot
Let’s test the bot to see if it’s working! Open telegram and search for the bot user name @PestoRicoBot and click on it. Before starting with Bot We need to run the Python script first:
python3 telegram_bot.py
After running the script click on “start” to start interaction with the bot and then type/start to see what the bot can do 🙂
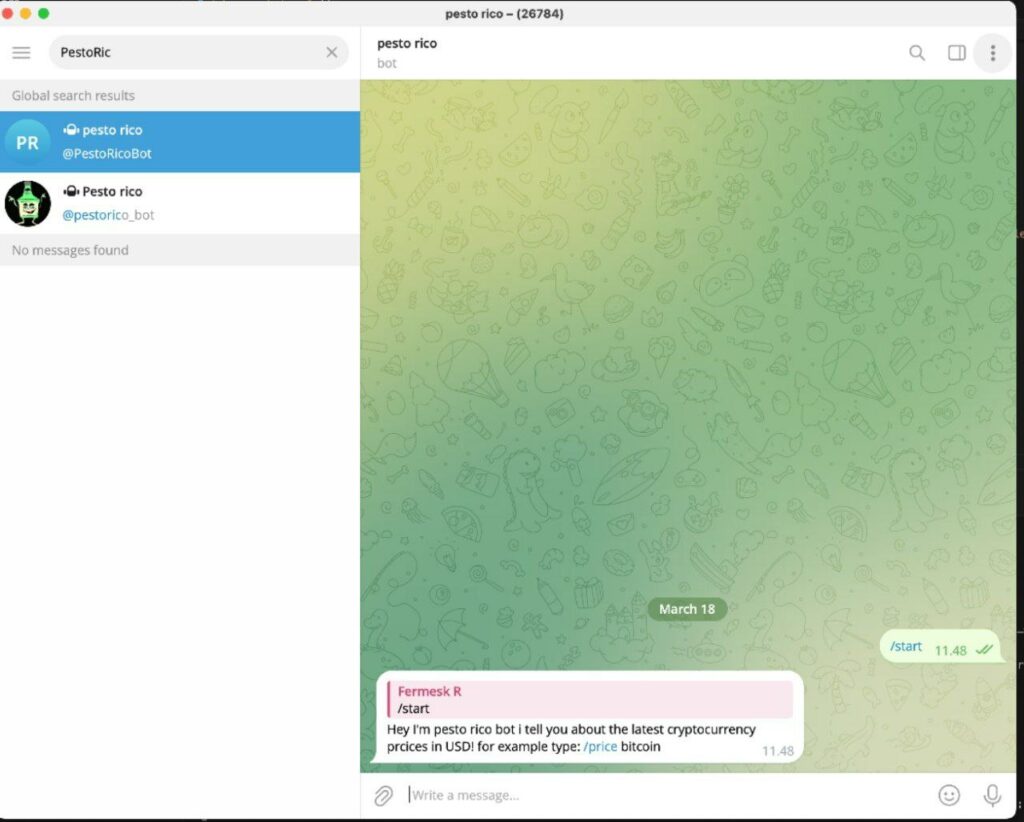
Usually for Telegram bots it’s common to use /start in the script as a command for explaining the bot utility. Now let’s try some cryptocurrencies to check the latest prices.
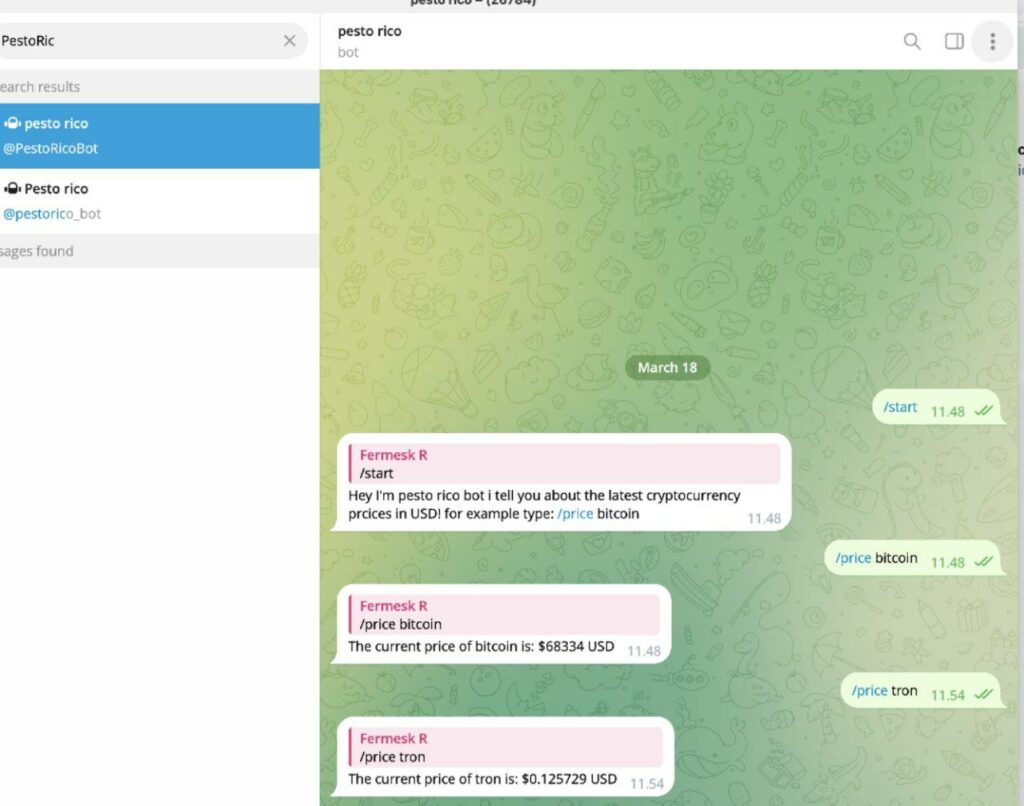
Yayyyy It’s working! Here it is, our first telegram bot. Congratulation!
Step 3: Dockerizing the code
For deploying your code on doprax, needs to be dockerized. dockerizing in general like any other programming tool depends on the size of the project could be simple or complex. dockerizing our little telegram bot of course is easy and simple. by following this step you can easily dockerize the bot.
Create a Dockerfile:
Create a file named Dockerfile in the same directory as your Python script with the following contents:
FROM python:3.9

WORKDIR /app

COPY . /app

RUN pip install --no-cache-dir telebot requests

CMD ["python", "telegram_bot.py"]
Create requirement.txt file
The requirements.txt file is like a recipe list for your Python project. It contains a simple list of all the additional Python packages, or ingredients, your project needs to run smoothly. Each line in this file represents a different package, such as telebot or requests. When someone wants to use your project, they can check this file to ensure they have all the required packages. Tools like pip can then read this file and automatically install all the listed packages, making it easy for anyone to set up and run your Python code without missing any crucial components.
To create a requirements.txt file for the provided Python script, you need to list all the Python packages used in the script. In this case, the script uses the telebot and requests packages. Here’s how you can create the requirements.txt file:
- Open a text editor.
- Add the following lines to the text editor:
telebot
requests
Step 4: Deploy Your Telegram Bot Online with Doprax
Alright, let’s make your Telegram bot come to life on the web! Deploying your bot on Doprax means it’ll be awake 24/7, ready to chat with anyone, anytime. Imagine it as moving your bot from your computer to a supercomputer in the cloud.
You need to create a GitHub repository for your code. We assume you know how to do this already. We won’t explain the process here since it’s unrelated to the main topic and requires a tutorial of its own.
Let’s walk through how you can easily do this on Doprax, step by step:
Log in to Your Doprax Account
To get started, navigate to the Doprax website and log in to your account. If you don’t already have an account, you’ll need to sign up for one. The sign-up process is quick and requires only basic information such as your name, email address, and a password. Once you’ve signed up and confirmed your email, log in to access the Doprax dashboard.
Create an App Space
Once you’re logged in, the next step is to create a new app space for your Telegram bot. Navigate to the dashboard, click on the “Container Platform” option in the menu, and then choose the “Create App Space” option.
The following page will open. Choose a name for the app space and select the desired size. In the case of the Telegram bot a server in Germany, the smallest size is a good option.
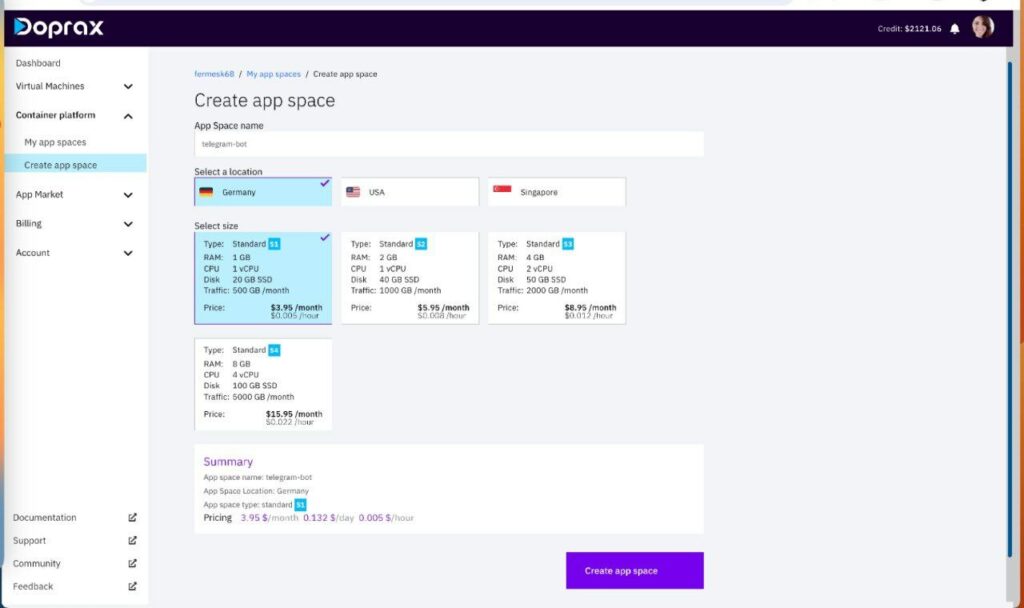
Select the options and then click on the “Create App Space” button. App space created and the following page will open.
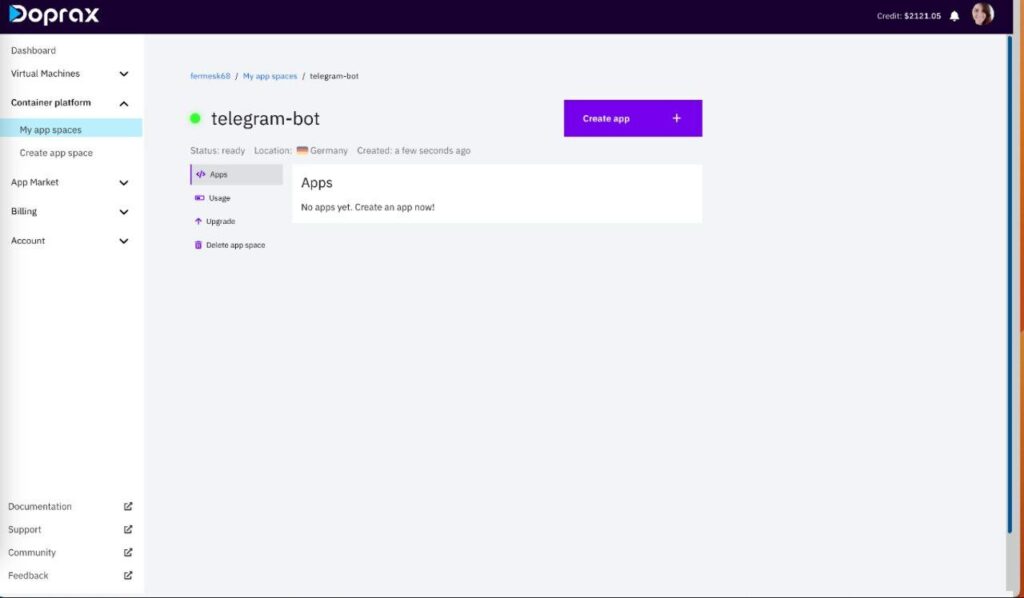
You need to create “an app” inside the app space. To create an app, click on “Create App.” Choose a name for your app, for example, Telegram bot or anything you prefer then click on “Create App” button.

After creating the app, click on it and this page will open. As we mentioned previously, you need a GitHub repository to import the code. Click on import code:

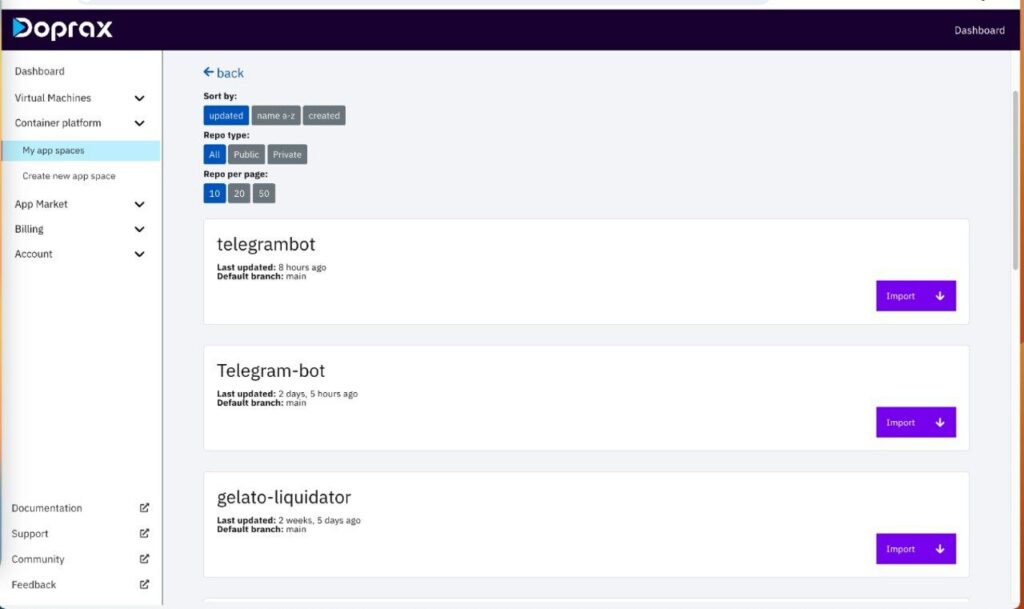
If your GitHub is not connected Doprax asks you to connect your GitHub. I already connected my GitHub account. Once your GitHub account is connected, you can view the list of your repositories. Choose the one that contains the Telegram bot.
After importing the code, you’ll have a dedicated page for the repository. Later, when you make changes to your code, you can update it in Doprax by clicking on “pull new changes”.
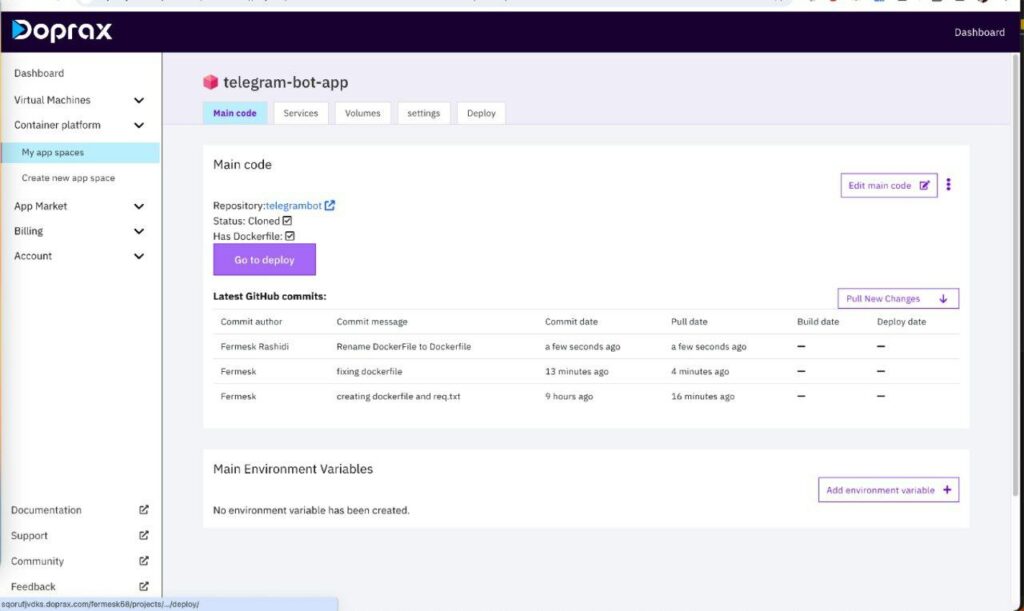
Now app is ready to deploy, click on “go to deploy button”. It leads you to the deployment page as you can see in the picture.

To start deploying your server, Click on the blue play button, as shown in the picture. The process takes less than one minute.
How do I know when the server is deployed and ready? When the play button changes to green the status of the serve turns into “running mode.”
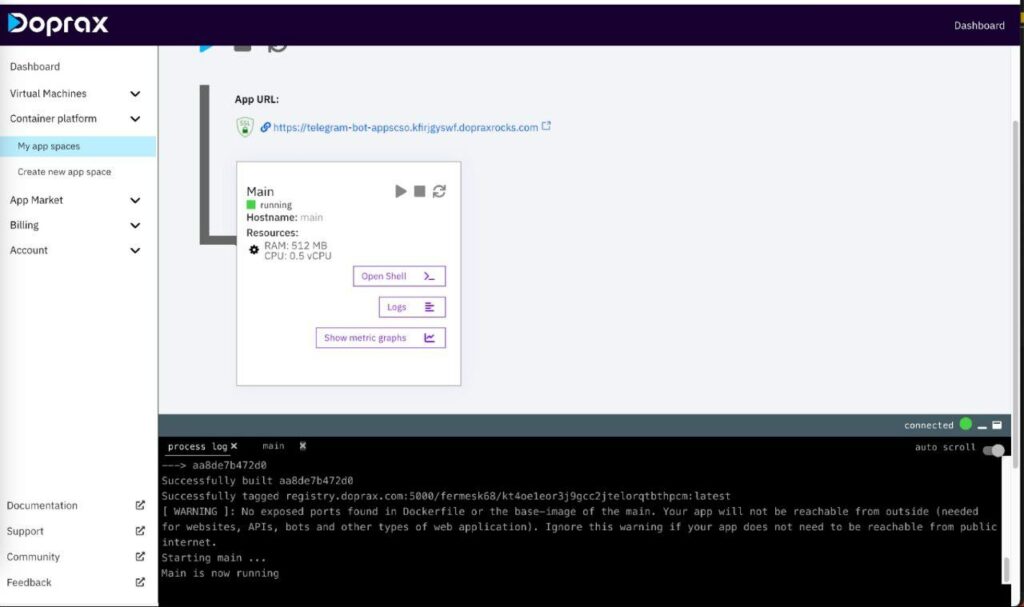
Well, congratulations you deployed your first Telegram bot! Now your Telegram bot is online and users can interact with it 24/7.
Please if you have any questions or need help don’t hesitate to contact us, we will be more than happy to help you. Cheers?