Django Channels is a package that allows WebSockets and other asynchronous protocols to be used in a Django application. It is built on top of the Django web framework and allows for the creation of real-time applications such as chat applications, line notifications, online games, and more.
It introduces a channel layer, which acts as an “inbox” for messages to enable different parts of an application to communicate asynchronously. This improves efficiency and responsiveness in handling real-time data.
By extending Django’s native asynchronous view, Channels allows Django projects to manage long-running connections, making it possible to work with WebSockets, MQTT, chatbots, and even amateur radio alongside traditional HTTP requests.
The Deployment Process
I believe you have gone through the tutorial in the Django Channels tutorial, as that is the foundation for this tutorial.
To deploy the app that we have implemented locally, we have to do certain things. We will first perform these things for development purposes and then go on to things to do for production.
Deploy on Doprax for Development purposes
Deploying on Doprax requires us to dockerize our project. So we’re going to create a Dockerfile and doprax.yaml file in the project directory.
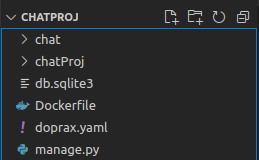
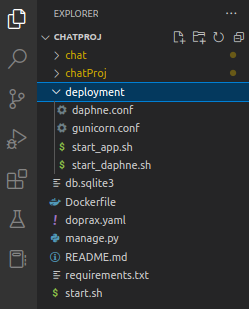
From the image above. You will notice the name of my Django project is chatProj and I have an app named chat.
In the Dockerfile, insert the following code:
FROM ubuntu:22.04


RUN apt-get update && apt-get install -y python3 python3-pip python3-venv
RUN python3 -m venv chat_env

WORKDIR /code

# install dependencies
COPY requirements.txt /code/
RUN /chat_env/bin/pip install -r requirements.txt

# Copy project
COPY . /code/

# Expose ports
EXPOSE 8000

RUN chmod +x /code/start.sh
ENTRYPOINT ["./start.sh"]
So above we are telling Docker to:
- Set our base image as ubuntu version 22.04 image.
- Install python3, python3-pip, python3-venv.
- Create a virtual environment named chat_env.
- Create our working directory code.
- Copy our requirements.txt file into the working directory.
- Install all packages in the requirements.txt file.
- Copy all our folders to the working directory.
- Expose port 8000.
- Execute the instructions in a file named start.sh.
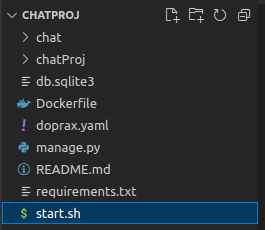
Create a start.sh file in your project directory.
Then insert the following code inside it:
#!/bin/bash
source /chat_env/bin/activate
cd /code

echo "----- Collect static files ------ "
python manage.py collectstatic --noinput

echo "-----------Apply migration--------- "
python manage.py makemigrations
python manage.py migrate


echo "-----------Run django local server--------- "
python manage.py runserver 0.0.0.0:8000
Above we are:
- Activating our environment
- Serving our static files
- Running our migrations
- Running normal runserver command for Django
The reason for running “python manage.py runserver” is that for our WebSocket app to work we need daphne. Daphne is the protocol server for asgi applications that Django channels use.
Since we have daphne in INSTALLED APPS in settings.py, it will take over the “python manage.py runserver” command. This is what makes this method of deploying your Django channels app development purposeful.
In the doprax.yaml file, insert the following code:
volumes:
  - name:  static
    mount: /staticfiles/

services:
  - redis:
      tag: 5
Above we are:
- Creating volumes named static, where our static files will persist.
- Using Redis since the Redis-channel layer is used in our CHANNEL_LAYER_BACKEND as in Django-channels tutorial documentation.
Great! We have set up the important files needed for deployment on Doprax. There are just 3 more things to do.
First, in the Django-channels tutorial, in the room.html file, there is a line that establishes a WebSocket connection but uses “ws://” when creating the path. We have to change it to “wss://”. “ws” means “WebSocket” while “wss” means “web socket secure”.

The second thing is to go to the settings.py file and change the “host” in the CHANNEL_LAYERS to “redis” instead of "127.0.0.1".
We are doing this because when we add the Redis service on Doprax, the hostname will be “redis”.

The third thing is to allow doprax in the ALLOWED_HOST setting in the settings.py file. You can do that by putting ‘*’, meaning allow all, or ‘.doprax.com’, meaning allow only those with doprax.com domain.
We are done! Now push your code to GitHub and head over to the Doprax cloud platform.
Deploy on Doprax
You’ll need to connect your GitHub account to Doprax and add credit to your Doprax account. Add credit to your account, as without this, you won’t be able to deploy your app.
There are various payment methods you can use to add credit to your account, like credit cards, different cryptocurrencies, and so on. Click the Add credit button to proceed with your payment. You can also do this by clicking on the “Billing” dropdown located at the left-hand side bar and selecting the “Add credit” option.
Doprax, just like any other hosting and deployment platform, requires authorization to access your GitHub account so that you can select a repository from your GitHub account to deploy.
To do this, go to your My Account option in your dashboard, click on the Connect to GitHub button on your dashboard, and a page will come up requiring you to grant authorization access to Doprax to connect and access your GitHub account. Click on the Authorize dopraxcom button to authorize Doprax.
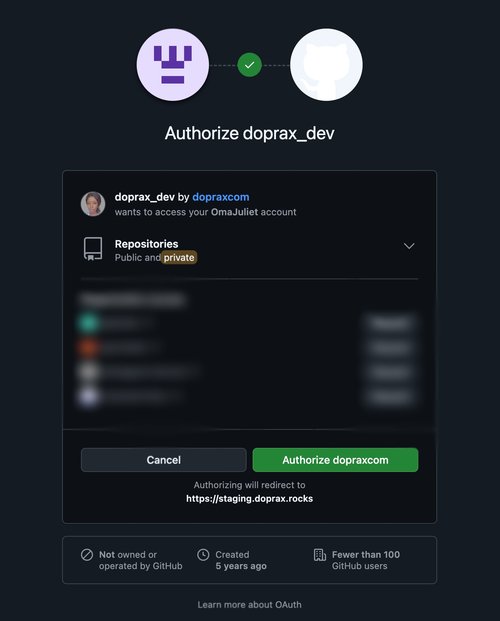
After completing this process, you’ll be redirected to the authorized application, Doprax.
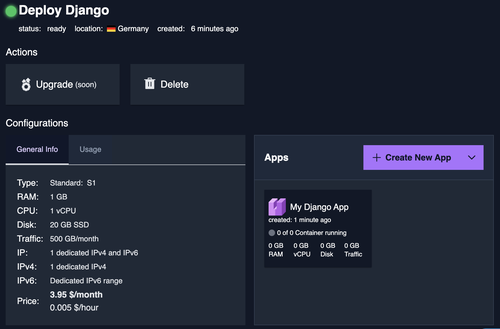
Create an app space
What you'll need to do next is create an app space for your app. If you already have an app space, good!
If you don't follow these steps to create one:
- Click the Container Platform dropdown located in your dashboard’s left-hand panel and choose Create App Space. You must give your app space a name, choose a location, and select its size. The available size determines the price options.
- Click the Create app space button at the bottom of the page once you’ve finished.
After successfully creating your app space, you’ll be taken to a page where you can view all of its details.
The next step is to add an app.
To add an app on Doprax, click the Create New App button. An input box will pop up, prompting you to enter a name for your app.
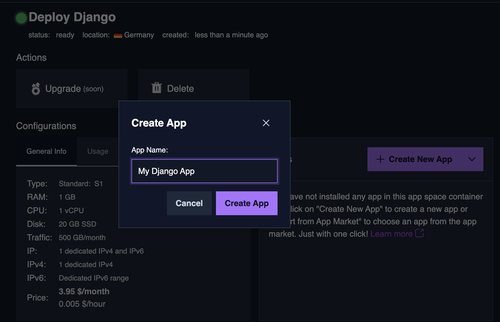
Click the Create App button and your app will be created.
Refresh the page and see your newly created app appear as an app under Apps section of that same page.
Click the app you just created and you'll be taken to a page where you'll see two options: Import from GitHub and Import from App Market.
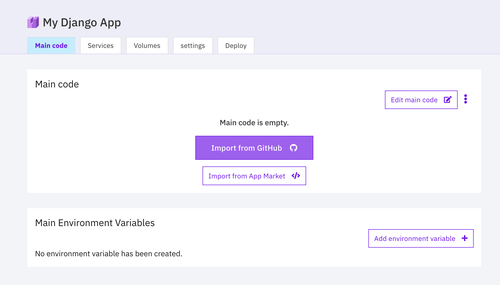
Click the Import from GitHub button. Import the repository you created on your GitHub.
After importing your code from GitHub, you will notice there is a message saying “doprax.yaml dependency file detected. Do you want to create dependencies created in it?”. Click "Yes" to create them.
Go to the services section by clicking on the services tab. You will notice Redis is automatically set up for you. This is because we allowed Doprax to create the dependencies in doprax.yaml file.
Now go to the Volumes section, and you will also notice it is automatically set.
Finally, head to the Deploy section and press the play button.
Deploy on Doprax for Production purposes
Managing Gunicorn and Daphne with Supervisor and Nginx
In this section, we will use Supervisor and Nginx to ensure both Gunicorn and Daphne run smoothly for our chat application.
- Supervisor: A process manager for UNIX-like systems that will help start and manage Gunicorn and Daphne for our chat app.
- Nginx: A web server that also acts as a reverse proxy and load balancer. It will:
- Route HTTP requests to Gunicorn
- Route WebSocket requests to Daphne
Setting Up the Deployment
To dockerize the application and configure the environment:
- Create a Dockerfile in the project directory.
- Create a doprax.yaml file, which Doprax uses to set up volumes and services automatically.
- Create necessary .sh and .conf files to properly configure Gunicorn and Daphne.
Now, let's define the Dockerfile for the project:
FROM ubuntu:22.04


RUN apt-get update && apt-get install -y python3 python3-pip python3-venv supervisor

ARG USER=root
USER $USER
RUN python3 -m venv chat_env

WORKDIR /code

# install dependencies
COPY requirements.txt /code/
RUN /chat_env/bin/pip install -r requirements.txt

# Copy project
COPY . /code/

COPY deployment deployment

COPY deployment/gunicorn.conf /etc/supervisor/conf.d/gunicorn.conf
COPY deployment/daphne.conf /etc/supervisor/conf.d/daphne.conf


RUN mkdir /logs
# Expose ports
EXPOSE 8000
EXPOSE 8001

RUN chmod +x /code/start.sh
RUN chmod +x /code/deployment/start_app.sh
RUN chmod +x /code/deployment/start_daphne.sh


ENTRYPOINT ["./start.sh"]
So in the above, we are telling Docker to:
- Set our base image as Ubuntu version 22.04 image.
- Install python3, python3-pip, python3-venv and supervisor
- Setting user as root
- Create a virtual environment named chat_env.
- Create our working directory /code.
- Copy our requirements.txt file into the working directory.
- Install all packages in the requirements.txt file.
- Copy all our folders to the working directory.
- copy deployment folder to deployment
- Copy the config files in the deployment folder to the conf.d folder after Supervisor is installed.
- Create a logs directory. This is to keep log files of daphne and gunicorn
- expose port 8000 (for gunicorn)
- expose port 8001(for daphne)
- Give permissions for executing the .sh files.
- execute the instructions at the start.sh file.
In your start.sh file, add the below code:
#!/bin/bash
exec /usr/bin/supervisord -n
Above we are starting supervisor.
In your doprax.yaml file, add the below code:
volumes:
  - name:  static
    mount: /staticfiles/

services:
  - redis:
      tag: 5
Above we are:
- Creating volumes named static, where our static files will persist.
- Using Redis since the Redis-channel layer is used in our CHANNEL_LAYER_BACKEND as in Django-channels tutorial documentation.
Now create deployment folder in your project directory and create the following files: daphne.conf, gunicorn.conf, start_app.sh, start_daphne.sh
We are creating configuration (.conf) files for Daphne and Gunicorn, which Supervisor will use to manage these processes.
- The start_app.sh file contains the command to start Gunicorn.
- The start_daphne.sh file contains the command to start Daphne.
Next, add the following code to the gunicorn.conf file:
[program:gunicorn]
command=/code/deployment/start_app.sh
directory=/code/chatProj
user=root
autostart=true
autorestart=true
redirect_stderr=true
stdout_logfile = /logs/gunicorn.log
Above we are:
- Creating a supervisor program and calling it gunicorn
- Telling supervisor the command to run to start the gunicorn program. The command is in the start_app.sh file
- Defining directory of our project
- Setting user as root
- Telling supervisor to autostart and autorestart the program
- Defining where logs go to.
In daphne.conf, add the below code:
[program:daphne]
command = /code/deployment/start_daphne.sh
directory=/code/chatProj
user = root
autostart=true
autorestart=true
stdout_logfile = /logs/daphne.log
redirect_stderr = true
Above we are:
- Creating a supervisor program and calling it daphne
- Telling supervisor the command to run to start the Daphne program. The command is in the start_daphne.sh file
- Defining directory to our project
- Setting user as root
- Telling supervisor to autostart and autorestart the program
- Defining where logs go to.
In start_app.sh, add the below code:
#!/bin/bash
source /chat_env/bin/activate
cd /code

echo "----- Collect static files ------ "
python manage.py collectstatic --noinput

echo "-----------Apply migration--------- "
python manage.py makemigrations
python manage.py migrate


echo "-----------Run gunicorn--------- "
gunicorn -b :8000 chatProj.wsgi:application
In start_daphne.sh, add the following code:
#!/bin/bash
source /chat_env/bin/activate
cd /code

daphne -b 0.0.0.0 -p 8001 chatProj.asgi:application
We've completed the key setup—Gunicorn and Daphne are now managed by Supervisor.
The final step is configuring Nginx as a load balancer to route HTTP requests to Gunicorn and WebSocket requests to Daphne.
Now, push your project to GitHub, then go to the Doprax cloud platform to set up your deployment as a service.
Nginx on the Doprax platform
Follow the steps in the "Deploy on Doprax" section of this tutorial:
- Import your code repository into Doprax.
- Allow Doprax to automatically create dependencies in doprax.yaml.
- Go to Services → Click "Add a service" → Select Nginx → Click "Add".
- Click the "+" button in Mounted Config Files to proceed with configuration.
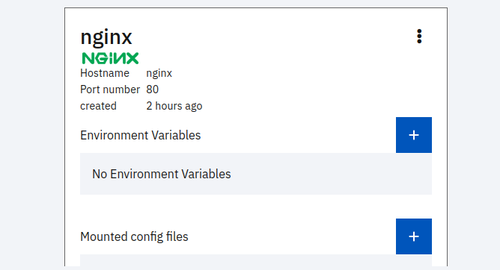
A box will open up. Now add what you see in the image below and press create.
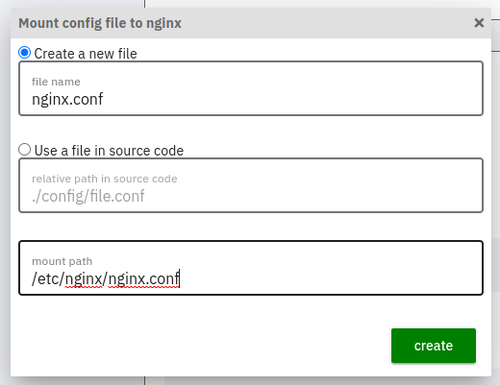
It is time to write in the nginx.conf file. Click on the edit file in the mounted config files part of the nginx service.
worker_processes 8;
user root;
error_log  /var/log/nginx/error.log;
pid /var/run/nginx.pid;

events {}

http {
    include mime.types;


    server {
        listen 80;

        server_name chat-appmjjg.eu-ccofhtfzmvsd.dopraxapp.com; #it should correspond to the one in deploy section for your app
        gzip on;
        gunzip on;
        gzip_types
            text/plain
            text/css
            text/js
            text/xml
            text/javascript
            application/javascript
            application/json
            application/xml
            application/rss+xml
            image/svg+xml;


           location / {
                proxy_pass http://main:8000;
                proxy_set_header Host $http_host;
                proxy_set_header X-Real-IP $remote_addr;
                proxy_set_header X-Forwarded-For $proxy_add_x_forwarded_for;
                proxy_set_header X-Forwarded-Proto https;

            }

            location /static/ {
                alias /staticfiles/;
            }

            location ~^/ws/ {
                proxy_pass http://main:8001;
                proxy_http_version 1.1;
                proxy_set_header Upgrade $http_upgrade;
                proxy_set_header Connection "Upgrade";
                proxy_connect_timeout 70s;
                proxy_send_timeout 70s;
                proxy_read_timeout 70s;


            }

    }

}
So if you notice in the code where location "/" is defined, the requests are proxy passed to Gunicorn, i.e http://main:8000;
For location ~^/ws/, requests are proxy passed to daphne, i.e http://main:8001;
So that is all. Head to the Deploy section and press the play button.
Hurray! The chat app is deployed and running.