Prerequisites
- An account on Doprax
- An Android device
V2ray is a network tool that can be used to bypass network restrictions and gain access to blocked websites and content. For more information on V2Ray, refer to this Doprax article.
On Doprax, there are functionalities and facilities in both the container platform and also virtual machines for v2ray. Check out the app market.
Stage 1: Deploying V2Ray Server on Doprax
One way you can deploy a v2ray server on Doprax is to use the virtual machine feature in Doprax to run v2ray. The v2ray panels need virtual machines to run.
Let’s make use of the Virtual Machine feature in Doprax to run a v2ray server from the app market because it’s more suited for personal use.
Creating a Virtual Machine
Go to your Doprax dashboard. Click the ‘Virtual Machine’ dropdown from your dashboard left sidebar.
Select the ‘Create new app space’ option. Select a location and the storage size that suits your project need. Input a name for your app space, e.g., “V2ray Doprax Deployment," or use the default name.
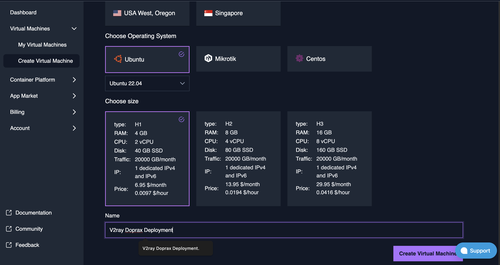
Click the Create Virtual Machine button.
V2Ray for Doprax in the App Market
Once that is done, wait for it to finish initializing. Click on the new virtual machine you just created to open it up.
It will show a round green color to show it's running.
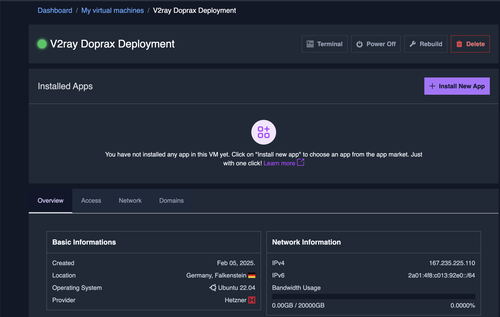
Then click the Install New App button. It will take you to the app market page, where you'll see a list of apps available on Doprax for instant deployment.
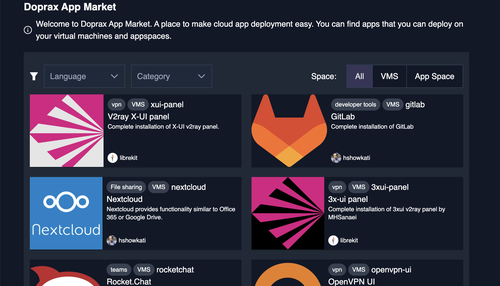
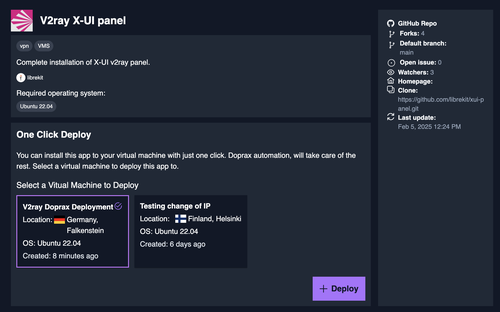
Select the V2ray X-UI Panel option. It will take you to the app details, select the virtual machine you just created and hit the Deploy button.
On that same page, in the terminal, you'll see the Logs. This will log the output of the v2ray installation on your virtual machine. Scroll to the very top and you’ll be provided with your own configuration link.
Copy out that configuration link, as that is the server address that will be used in any client app.
With that, you’re done for stage one. You’ve successfully deployed the v2Ray server on Doprax using a virtual machine. The next step will be to import that link into a v2ray client depending on the operating system of the mobile phone you intend to make use of.
For Android devices, there are some V2Ray clients like e-V2ray and v2rayNG available for use. This tutorial will guide you on how to use the v2rayNG app.
Stage 2: Installing the V2ray Client App on an Android Device
Download the v2rayNG app from the Google Play Store on your mobile phone. It will open up the app in Google Play; click Install and wait for it to finish installing.
Below is an image of the v2rayNG logo.
After a successful installation, open up the app. The v2rayNG app has a very simple interface and is easy to navigate. Click on the plus ‘+’ sign at the top right-hand corner of your app. It will open up options to pick from to configure your VPN server.
Since the configuration link provided by Doprax starts with vmess, select the “Type manually[Vmess]” option from the dropdown. It will open up the page where your configuration settings for the Vmess server are, and that is where you’ll have to input some details for your server.
Stage 3: Importing Configuration Link into the V2ray Client
Now it’s time to import the configuration link you copied from the log terminal of your Doprax dashboard in stage 1. The link is the v2ray server you deployed on Doprax and it starts with a “vmess…..” string.
Adding a Server
When the server configuration file screen opens up, enter a server address, remarks, port, and ID.
In the remarks input field, enter a remark, e.g., v2ray Doprax deployment. For the Address input field, enter the vmess config link you copied.
Leave the default port number ‘443’ as the port number in the port input field. Input any random ID number or a combination of strings and numbers as ID in the ‘id’ field. Those are the 4 fields that need to be filled to add a server.
Click on the tick (✓) sign at the top right corner of that page and it will be added as a server on the main page of the app.
Connecting to the server
After successfully adding the server and it displays on the app’s main page, you can activate it by clicking the v2rayNG icon that is inside a circular gray background, located at the bottom right corner of the page.
Once the server is activated, that icon’s color will change to a bright orange color, meaning the VPN is connected and ready to be used.
You’ll also notice the VPN bar at the top of your phone screen near the battery bar. Now you are ready to access the internet from anywhere without any restrictions and you can access restricted sites.
To check if this works properly, visit any site on your browser, like "www.doprax.com". If the site loads, it means the VPN server is working. To stop using the v2rayN server to access the internet, go to your v2rayNG mobile app and click on that v2rayNG icon at the bottom right that you clicked when you connected the server. This will disconnect your device from the VPN service.
And that’s it! You’ve been able to successfully create an app space for v2ray server deployment, deploy it on Doprax, import the config link on a v2ray client for Android, add the server to the configuration settings, and connect to it in order to access the internet.