Introduction
Doprax App Platform is a product of Doprax Cloud. In cloud computing terms, Doprax App Platform is considered a Platform as a Service (PaaS). Doprax App Platform takes care of the infrastructure and run-time of the web service so that developers can focus on their actual product. You can create websites, web services, backend APIs, static websites, and much more in Doprax without worrying about the infrastructure.
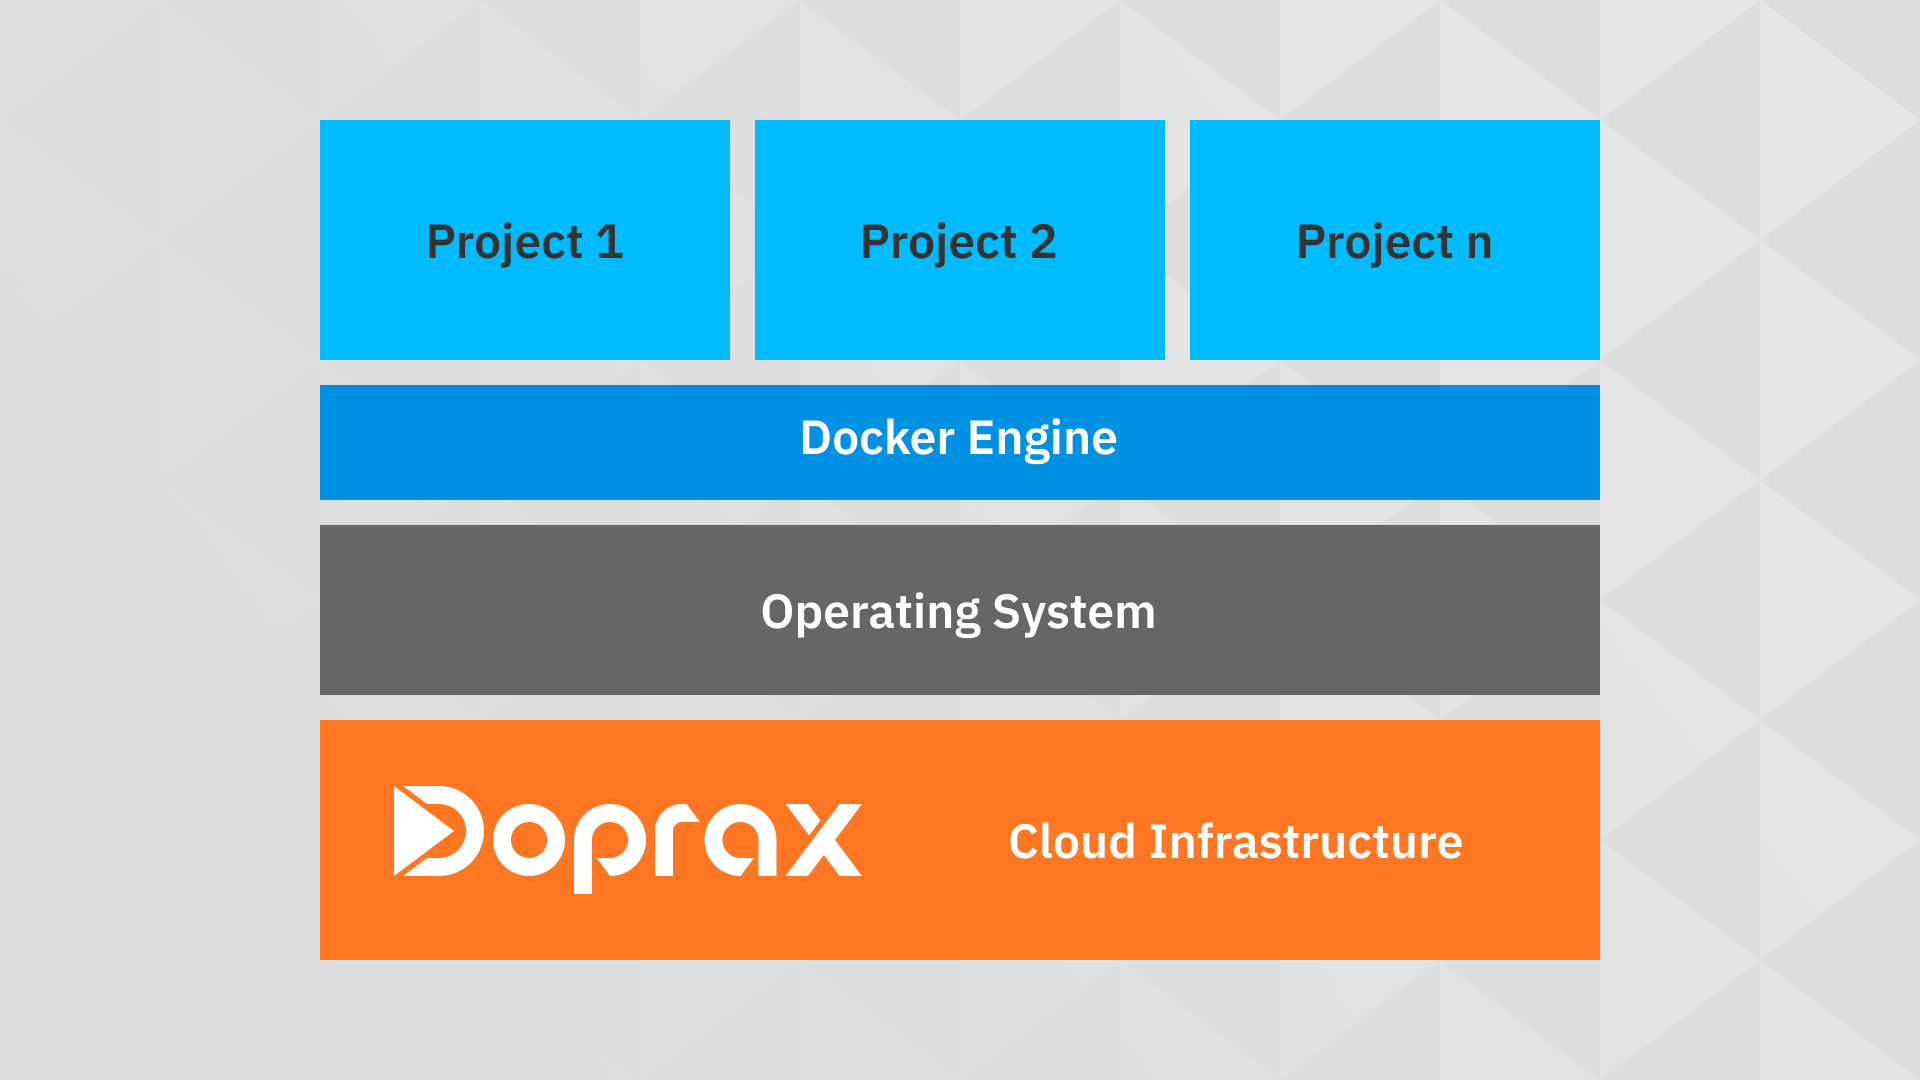
Doprax App Platform, uses containerization technology, i.e. Docker, to run workloads. Containerization is defined as a form of operating system virtualization, through which applications are run in isolated user spaces called containers, all using the same shared operating system (OS). A container is essentially a fully packaged and portable computing environment.
Containers are “lightweight”, meaning they do not require the overhead of running an operating system within each application. Containers are inherently smaller in capacity than VMs and require less start-up time. This will result in far more containers running on the same compute capacity as a single VM.
So basically, containers are more efficient and lightweight.
Doprax App Platform’s Architecture
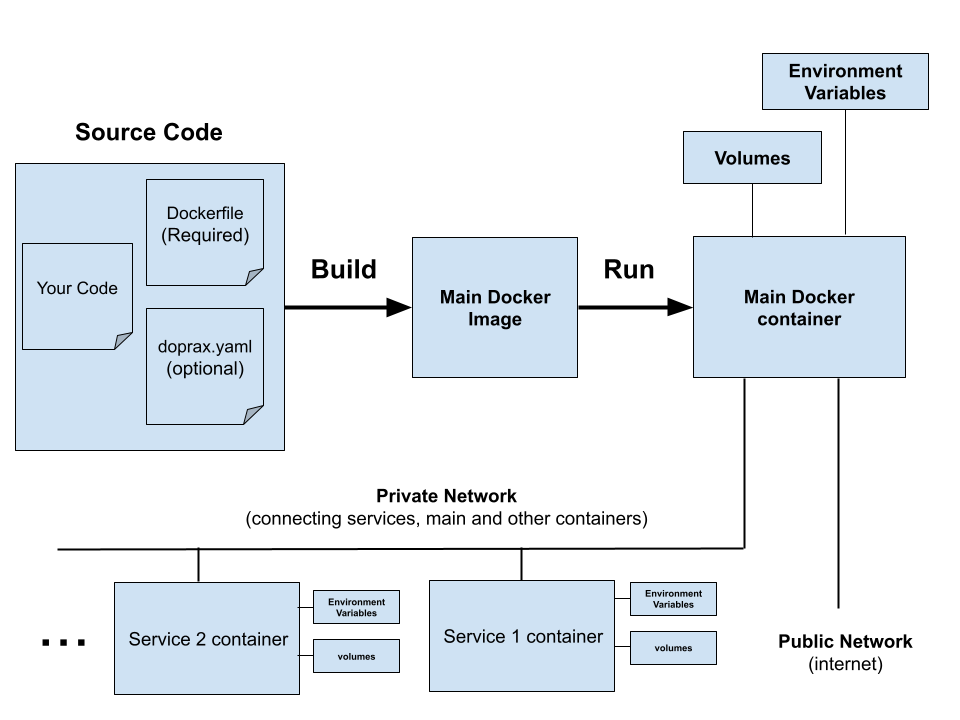
In Doprax, each app is a collection of one or multiple containers that are working together to form a working application. Each app must have a main container.
This main container usually runs the source code of your application (for example, a Django project or a NodeJS app). Typically, the services are databases (like MySQL or Redis) that are used to store and retrieve data.
Apps
Your work in Doprax is organized into apps. Each app has a main container that runs the source code of the application. Also, each app can have one or multiple services.
All docker containers of the same app are connected on a private network dedicated to that app. So basically, all of your containers (main and all services) are on the same network and each one of them can talk directly to others using their hostname.
Private Network of apps
A private network is dedicated to every app. The details of the private network are accessible in the deploy page in the dashboard. All containers of the app (main, services, plugins, …) are connected to the same network. You can have up to 256 containers connected to your app’s network.

Main
The Main container is the most important part of an app. The main container is responsible for running your application. Simply put, a docker container is the running instance of a docker image. You can add volumes and environment variables to the main container from your app detail page in the Doprax dashboard.
Items in main are:
- Source code
- Dockerfile
- doprax.yaml for Infrastructure as code
- Volumes
- Environment variables
Source code
Each source code should have a valid Dockerfile at the root of the source code. This source code will be used to create a Docker Image of the main. There are multiple ways to add source code to your main.
- Connect your GitHub account and import source code directly from your GitHub repos.
- Insert source code from app library
- Use Doprax online editor
- Use Doprax cli (coming soon)
You can always use the online editor to take a look at the source code of your app. Go to dashboard > main to insert and edit the source code.
Dockerfile
A Dockerfile (with capital D) is a text file that contains all the necessary commands (instructions) to build and run a docker image. The docker engine will use these commands to build a docker image from the Dockerfile. The source code that you provide to the main must have a valid Dockerfile at the root of the source code.
Port expose
Each Dockerfile should expose a port to receive requests from the outside world. If the base image has already exposed a port, it will not be necessary to expose it in Dockerfile again.
By default, the main container is the one that will face the outside world on the exposed port via the public network (i.e. internet). That port will be automatically detected and will be exposed to the outside world so that it can listen to HTTP requests. If one of the services exposes port 80 (HTTP) or port 443 (HTTPS), this service will take precedence and will be the interface to the outside world. For example, the Nginx service exposes port 80. So when you add an Nginx service to your app, every request will initially hit the Nginx container. The Nginx container will then proxy the incoming request to an appropriate container (usually the main).
Starting command or entry point
Each docker file must have a valid starting command or entry point. The container will be running as long as the starting command or entry point is running. It is a best practice for each container to have only one primary process and if the process fails, the container should crash and another container should start immediately.
You can specify a shell script as the entry point of your docker image. In the shell script, you can create a custom initialization. For example, you can check the readiness of services, perform some tests or health checks, create or edit databases or migrations, and basically anything that you want.
It is also possible to have a process supervisor like supervisorctl to manage the processes inside the main container. This is particularly useful when you need to have multiple processes in the main container. For example, when deploying a Django application with Django-celery you need to start a separate celery process besides the main Django app. For this purpose, you can create a process supervisor for the Django application and also the celery app. Then you can start supervisorctl and in turn, it will start every process that has been registered with the supervisorctl.
doprax.yaml (infrastructure as code)
Infrastructure as code is the practice of defining the infrastructure and dependencies needed to run the application using machine-readable definition files (here doprax.yaml) rather than interactive configuration. You can define the dependencies and configuration of your application inside a doprax.yaml file in your source code root. You can declare services like MySQL or Redis, define volumes, and add environment variables.
Environment variables
An environment variable is a dynamic-named value that can affect the way running processes will behave on a computer. They are part of the environment in which a process runs. Environment variables are essential for any containerized application. They are the primary way to configure and customize the behavior of containers at runtime or a way to provide some context information to the running application.
It can be used for many cases, for example, an environment variable could change the log level, provide sensitive information like keys or passwords. The environment variables that are provided to the main will be injected into the container when it starts running.
Volumes
Docker’s default storage (writable container layer) is ephemeral. It means that if you create a file inside a running container when you stop or restart that container, the file will be lost.
The design philosophy for this is to make containers disposable. But in many use cases, we need to store data. For example, a user may upload a file to our application, and we need to be able to store and retrieve it at any time. Or when we have a database, and we need to store our data possibly forever! For this purpose, we will use docker volumes.
Volumes enable us to persist (save) data regardless of the lifetime of our container. Volumes can be attached to any container (both main and also services). You can have as many volumes as you need.
Services
Services are software and utilities that do a specific job and usually provide some kind of functionality to the main container. A typical example of service would be a MySQL service. Services are run in parallel with the main container and are all connected to the same private network.
Adding services to app
When you add a service to your app, you are instructing Doprax to run the docker image of the service and connect it to the apps’s private network. You can add a service manually by going to the services section in your app’s dashboard and clicking ‘add service’. You can also add a service by declaring a service in your doprax.yaml file, and it will be automatically added to your app (it will ask you first by the way).
You can add up to 255 services to your app. Services can be independently started or stopped.
Communicating with services
All containers of the same app are connected to the app’s private network. Each of the running services will receive an internal IP address. To communicate between main and services and also between services themselves, you should use the hostname of the service. The hostname of each service is by default the name of the service.
For example, when you add a MySQL service to your app, the hostname of the MySQL container will be MySQL. So for connecting to MySQL instead of localhost or 127.0.0.1, you can use MySQL as the hostname. For example, when installing WordPress, the installation will ask you about the MySQL host which in our case is MySQL. Or in a Django application, you need to specify the hostname of the database in the settings.py file.
In a local environment, it is usually ‘localhost’ or ‘127.0.0.1’ but on Doprax you just enter the name of the database service (MySQL or PostgreSQL). The same rule applies to every service container.
Volumes for services
Like every other container, services also need to have volumes to be able to persist (save) data. If you don’t use any volumes, by default everything will be written to the writable layer of the docker container, and it will be wiped out when you stop or restart the container. However, if you mount a volume to the path you write to, everything will be saved permanently. For example, MySQL service will save data to /var/lib/mysql path. If there are no volumes mounted to this path, every time you restart your MySQL service, everything will be deleted and the MySQL container will start with no data. But you can easily create a volume and mount it to /var/lib/mysql and save everything.
Volumes are also shareable between different services and main so that information written by a container could be read by another container. One good example of this is when you need to serve static files (CSS, JS, images, …) of your Django project using Nginx service.
The static files of the Django project will be put in a directory called static root by the collectstatic command. For example, the static root could be /appdata/static directory. The Django project is in the main container, and there should be a volume mounted to the main container on the static root path. But Nginx will need access to the static files in order to be able to serve them to the user. To do this, you can share the static volume of the main with the Nginx container. The mount path on the Nginx container could be different from the main container.
Environment variables for services
Just like environment variables for the main container, service containers can have environment variables to customize their behavior. For example, the official MySQL image, during the initialization, will create databases and users based on the environment variables.
Mounting config files to services
Some service containers let you configure them the way you want by mounting a config file directly on them. You can do this in your dashboard > services. For example, if you want to change the internal configuration of a MySQL service, you can easily mount a config file to this path /etc/mysql/my.cnf . Using a Nginx service for reverse proxy, you can configure it by mounting the config file to /etc/nginx/nginx.conf path.
Add Domain
By default, Doprax provides a free subdomain for each of your apps. Also, you can use your own custom domain. Do use your domain, you should create a DNS record of type A.
DNS records
In order to use a custom domain, go to the settings of your app and add a domain. You will be instructed to create the DNS record. Your DNS record should be of type A and point to the IP address will be provided to you after adding a domain. For example, if your domain is example.com, you should create the following DNS
| Record Type | Name | Value |
| A | example.com | Provided IP (xx.xx.xx.xx) |
Also, you can add your www version by checking the checkbox. After creating the records, you can verify them by clicking the verify button.
SSL (HTTPS)
After you successfully add your custom domain, the first time you run your app, an SSL certificate will be generated for your domain. Doprax ingress will take care of issuing the certificate and also renewal of it. All non-ssl requests will be automatically redirected to an encrypted SSL connection.
By the time a request reaches your app’s exposed interface (usually main), the SSL connection is terminated, and you can securely receive the unencrypted request at the exposed port of main.

Deploy
All deployment operations are controlled in the deploy section.
- Change the resource (RAM, CPU, DISK) that is allocated to any of your services or main container.
- View the logs from the each container.
- Access command line shell
Resource size
The amount of RAM, CPU cores and disk space that is used by each of your containers is separately configurable. You can allocate more resources to the ones that need it, without having to change the others.
Shell access
In some use cases, it is necessary to have a command line (shell) access to your running container to execute a one-time command, debug, or any other task. The container (main or service) must be in a running state to start a shell. For example, in a Django application, you may have to do some migrations and need to access the command line interface. You can also open a shell terminal to a MySQL service and do some dump and reload operations.
Case study Virascience.com
Virascience.com is a scholarly search engine and database that is hosted on the Doprax cloud platform. Virascience indexes more than 10 million full-text open-access scholarly articles and provides a search interface to the users. It also has robots that crawl the internet and find newly published articles and index them regularly.
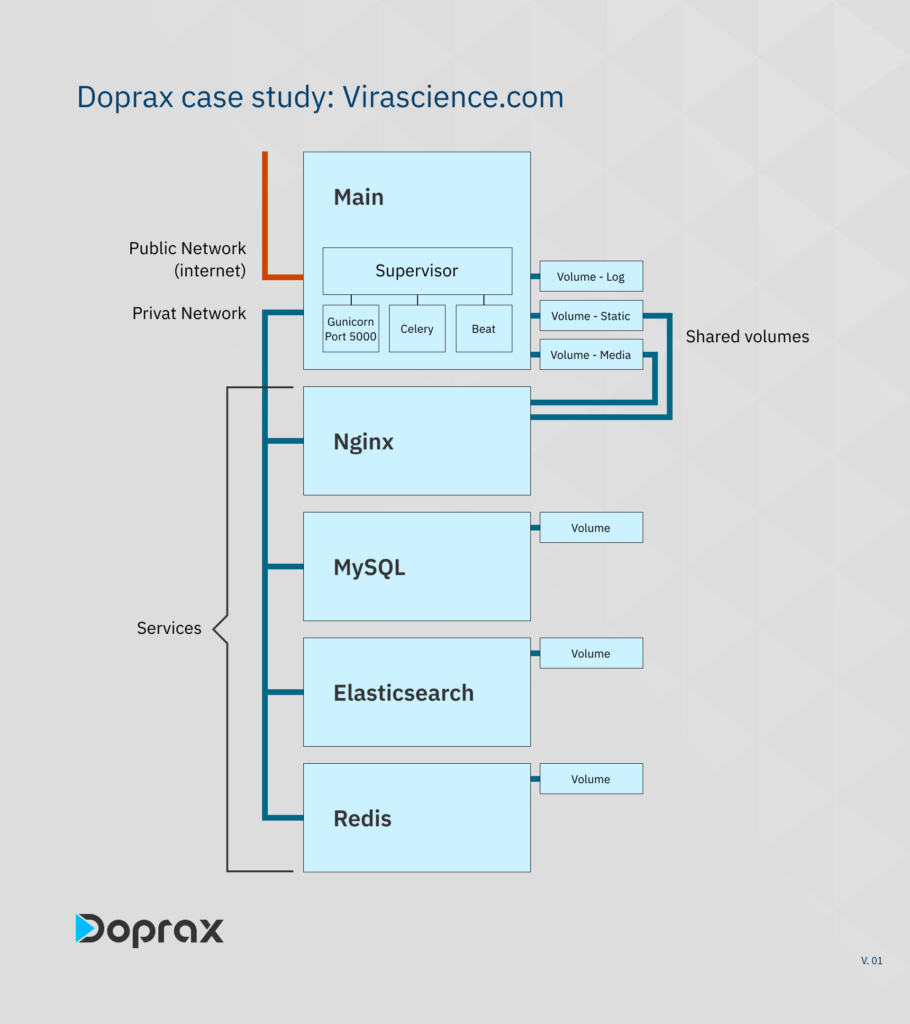
The main application
The source code of the application is hosted on GitHub and by connecting the GitHub account to Doprax the source code can be pulled anytime any changes are published. The main application has three elements:
- A Django app
- django-celery workers
- celery-beat for periodic tasks.
Since each of these three elements is a separate process but have to live in one container, a process supervisor (supervisorctl) has been used to manage all of these three processes. The supervisor makes sure these three processes are running and when each one of them crashes for any reason, the supervisor will try to start them again.
You can see more details in the attached Dockerfile.
The base image of the Dockerfile is the official Ubuntu 18. Next, the necessary packages are installed on this base image. The packages are python3, python3-pip, mysql-client and also the supervisor package itself.
Then a virtual environment is created, and all requirements listed in requirements.txt will be installed on the virtual environment.
The source code is copied and next, all the supervisor config files to start the main Django app, celery and celery-beat are copied to /etc/supervisor/conf.d/ path that holds all processes under supervisor control.
Then we expose port 5000 and make the process start shell scripts executable (+x). The entry point is also specified on the last line. The entry point is a shell script (start.sh). By running this shell script the supervisor will start running and in turn, it will start the main Django app (using gunicorn), celery, and celery-beat processes.
Django application
The bulk of the main application is a Django app with +10 Django apps. Gunicorn is used for serving the Django application on port 5000. The gunicorn is configured to have 12 workers. The Gunicorn process is supervised by the supervisorctl.
Celery
The celery task manager is used to perform asynchronous tasks. Redis is used as the task queue. The celery process is started by the process supervisor on every start-up of the container.
Celery Beat
Celery beat is used to handle periodic tasks, mainly starting the crawlers and bots to search the internet for new articles. The celery beat process is also started by the process supervisor on every start-up of the container.
Main Volumes
Three volumes have been used for the main container.
- Static volume
- Media volume
- Logs volume
The static directory is mounted to /app_data/static/ path inside the main. This directory is also shared with the Nginx service that will be discussed later.
The Media directory is mounted to /app_data/media/ path inside the main. Like the static volume, the media volume is also shared with Nginx to be able to serve media files directly from Nginx.
The logs volume is mounted to /logs/. This way, any process that needs to output persistent logs can write in this path and save all log files.
Main Environment variables
To make the development of the application easier in local development environments, some environment variables are used to tell the application the context in which it is running. Here are some of the environment variables:
- DB_NAME
- DB_PASS
- DB_HOST, REDIS_HOST, ELASTICSEARCH_HOST
- DEBUG
These values are injected into the running main container when it is started. So the Django application can read the values from the environment variables and behave accordingly. It is also best practice to read the values from the environment variable only once in the settings.py file and read from the Django conf settings anywhere you want to use the value.
Used services
Nginx
The Nginx service is the only exposed interface to the outside world in the whole app. When you add the Nginx service to your app, it will be the container that will be exposed to the outside world.
The Nginx is used as a reverse proxy. It forwards requests to the Gunicorn web server (that serves the Django application) and also directly serves the static and media files to the user.
To configure a Nginx container, a Nginx config file should be mounted to /etc/nginx/nginx.conf. To mount a config file, go to the services page of your app, and under the “Mounted config files” ,click (+) button. You can create a config file from scratch on the server using the online editor or you can mount a config file that already exists inside your app’s source code.
In Virascience, port number 5000 of the main is exposed. Gunicorn is listening to every incoming request that arrives on this port. Since all incoming requests will initially arrive at the Nginx service, a proper configuration to proxy the incoming request to port 5000 of the main should be done on the Nginx’s config file. It is something similar to:
location / {
proxy_set_header Host $http_host;
proxy_set_header X-Real-IP $remote_addr;
proxy_set_header X-Forwarded-For $proxy_add_x_forwarded_for;
proxy_set_header X-Forwarded-Proto https;
proxy_pass http://VIRASCIENCE_HOSTNAME_HERE:5000;
}
It should be noted that since the SSL is terminated by Doprax ingress before it reaches the Nginx, there is no need to set up an SSL certificate or listen to the 443 port. Since we are inside the app’s private network, everything is done using port 80 and unencrypted requests.
As we mentioned in the volumes section of the main, two volumes, static and media, are mounted on the main container to hold static and media files respectively. Writing these files is the responsibility of the main container.
The static folder is populated using the collect static of Django in the startup process. The files inside the media folder are user-uploaded content that is uploaded using the main Django application in the main container. But the Nginx container needs access to these files in order to be able to serve them. To do this, we will also share these two volumes with the Nginx service.
MySQL
MySQL has been used as the database for the Django application. No special configuration was needed. The only configurations are database name, username, and password, which are given to the MySQL container on startup using environment variables. A volume has been mounted to /var/lib/mysql so that the data is persisted. The main can communicate to the MySQL service over the private network.
Elasticsearch
In Virascience, Elasticsearch is used to index articles and perform full-text search on all the documents. In order to properly configure Elasticsearch, a few environment variables should be defined on it:
- discovery.type : single-node (to create a single node cluster)
- bootstrap.memory_lock : true (To avoid using SWAP memory and boost performance)
- ES_JAVA_OPTS : -Xms8g -Xmx8g (determine java heap memory size)
Redis
Redis is used both as the key-value store for the Django application and also the message broker for celery and celery-beat.